banner

How to Install a Drip Irrigation System

928 Publish by 2014-08-27

Drip Irrigation System

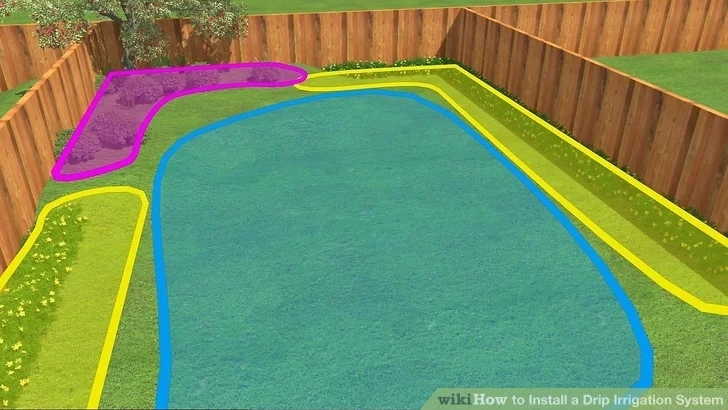
Drip irrigation system is an efficient, convenient way to water your garden. It supplies the water directly to the roots of your plants, reducing evaporation and water loss through wind flow. Connect it to a timer, and your garden will water itself automatically, with minimal upkeep.

Part 1.Planning the drip irrigation System

1.Check legal requirements. Before you begin, contact your water purveyor or municipal water department to ask about laws, codes, and permits related to drip irrigation systems. Each area and water purveyor may have its own requirements, and some require a licensed irrigator and/or backflow tester to be present during the installation. These precautions ensure a safe installation that will prevent contamination from your drip irrigation system into drinking water.

  • If you plan on using the drip irrigation system as a temporary system while your landscaping gets established, mention the expected time frame. The requirements may be lighter.
  • In many areas, including some U.S. states, proceeding without the proper permits or supervision can lead to fines, a court appearance, or even jail time.
2.Divide your garden by water needs. Before you purchase your supplies, you’ll need to know what exactly you need. Sketch a rough map of your garden, or the area you wish to drip irrigation system. Divide the map into several regions based on one or more of the following:
  • Watering needs of each plant. Mark these heavy, medium, or light.
  • Levels of sun or shade. If most of your plants have similar watering needs, use sun exposure to divide your garden. Plants in full sun will need more water than plants in partial or full shade.
  • Soil types: Take this into account if your garden has major soil variation. See below for more information.
3.Design the irrigation layout. A typical drip tube can reach a maximum length of 200 ft (60 m), or 400 ft (120 m) if the water enters the line at its center.[1] If you need more than one drip tube, you can install a lateral line with two or more drip tubes extending from it at different points. For large gardens, use a pressurized mainline instead of the lateral line, and consider looping it in a full circle, which allows you to double its length to 800 feet (240 m) (240 m). Sketch the proposed layout onto your map.

  • Ideally, each drip tube should serve an area with similar watering needs.
  • “Distribution tubing” is a smaller alternative to drip tubing. This can only reach a maximum length of 30 ft (9 m). Use only for potted or hanging plants to prevent clogging.[2]
  • Typically, the mainline runs along one length of the garden, or around the entire perimeter for large properties.

drip irrigation system

4.Divide your garden into watering zones. Your drip emitters and tube diameter will determine the system’s maximum GPH (gallons per hour). In order to meet your entire garden’s water needs, you may need to divide your system into several zones. By installing a “zone control valve” in each zone, you can direct flow to one or two zones at a time.[3] It’s best to install each valve near the center of the zone, so it pushes water out at even pressure in all directions.
  • If the drip system will be permanent, it’s worth the cost of an electric valve that hooks up to an irrigation controller. Manual valves are tedious to operate and often mistakenly left operating for longer than intended.
  • The equipment you buy should come with recommended maximum tube length and GPH. You can also calculate this yourself using hydraulic flow calculations.
5.Decide on a water delivery method for each area. There are several ways to deliver water from the drip tubing to the plant. Determine which to use for each area in your garden:[4]
  • Drip emitter: The most common option, this is a smaller diameter line attached to the main tubing. Punch holes using a drip irrigation hole punch anywhere along its length, so the water flows toward the plants. See below for information on types of drip emitters.
  • Pre-installed emitter lines: This drip tubing has evenly spaced emitters, suitable for crops, orchards, and vegetable rows. It also works for shrub beds and other densely planted sites, and even under turf if installed correctly.
  • Micro-sprinkler heads: Halfway between drip irrigation and sprinklers, these low-pressure sprinklers are less efficient but harder to clog, which may be useful in hard water areas.[5] They work well in shaded area and for plants that prefer misting.
  • Porous pipe: This cheap alternative to drip tubing drips along its entire length, with no way to maintain water pressure or control rate. This is not recommended, as it clogs easily and may have a shorter maximum length. Never mix it with other types of emitters.


6.Narrow down the type of drip emitter. If you decided to go with drip emitters, there are many types to choose from. Basic turbulent-flow emitters are a good default, but consider the following options in special circumstances:[6][7][8]
  • Note: regardless of the time of emitter you choose, it should be self-flushing so it stays clear when the zone is shut off.
  • Use pressure-compensating (PC) drip emitters for changes in elevation over 5 ft (1.5 m). The “PC” label is unregulated, so look up product information and confirm it works with your desired flow rate before buying.
  • Adjustable drip emitters can be water wasting and prone to flooding plants if not checked often. If your plants have varying water needs, it’s usually better to install several standard, color-coded emitters at different strengths (such as 1, 2, and 3 GPH).
  • Turbulent-flow emitters are a good, cheap option for all other purposes. Vortex, diaphragm, and long-path emitters will all work fine. These variations are less important than the differences described above.
7.Plan the flow rate and spacing. Now’s the time to figure out how many emitters you need. Each emitter has a certain flow rate, usually expressed in GPH (gallons per hour). Here are some general guidelines based on soil type:[9][10][11]
  • Sandy soil: This soil falls apart into grains when rubbed between your fingers. Space 1 to 2 GPH (3.8 to 7.6 liters per hour) emitters about 11″ (28 cm) apart.
  • Loamy soil: Quality soil, not too dense or loose. Space 0.5 to 1 GPH (1.9 to 3.8 LPH) emitters about 17″ (43 cm) apart.
  • Clay soil: Dense clay, slow to absorb water. Space 0.5 GPH (1.9 Lph) emitters about 20″ (51 cm) apart.
  • If using micro-sprinklers, space them 2–3 inches (5–7.5 cm) further apart than described above.
  • For trees or other plants with higher water needs, install two emitters spaced evenly around the root zone. Don’t mix and match emitters with different flow rates on the same drip line.


8.Purchase equipment. Besides the pipes and emitters, you’ll need a plastic fitting for each connection, plus an end cap or flush valve for each drip tube. In addition, you’ll need an “air vent” on the lateral line. This pops open when the zone shuts off to help flush the emitters. Read the instructions in the next section for additional equipment necessary to connect the drip irrigation system to a water source.
  • Compare all sizes and threads before purchasing. You’ll need adapters to connect pipes of different size, or to attach “hose thread” to “pipe thread.”
  • If using a lateral line, use black polyethylene tubing. (PVC irrigation piping is only rated for below-ground use.)
  • If using a mainline, choose piping made from copper, galvanized steel, PEX, sturdy PVC, or heavy polyethylene. Bury PVC to protect it from sunlight.[12]
  • The size and type of your pipe determines the maximum flow rate. For most homes, ¾” Class 200 PVC pipe is large enough, supporting a flow of 10 gallons per minute.[13] If your water supply has a higher flow rate than that, increase the size of your pipes and zone valves accordingly.

 Part 2.Connecting to the Water Supply

1.Install the mainline with a backflow preventer. Every irrigation mainline must be its own closed system, with backflow assemblies preventing any contamination back into the drinking water supply. Your backflow assembly must stop all backflow from both back pressure and back-siphonage, and comply with all laws and local code.


2.Hook up a controller. If you want to water your garden automatically, install an irrigation controller to a convenient location. Wire this to each zone control valve using direct burial irrigation wire (type AWG-UF) and waterproofed wire splices. Sheathe any above ground wires in conduit.[14]


3.Add a filter. Drip tubing is easily clogged by rust, minerals, and other particles in the water. Use a mesh sized 155 (100 microns) or higher, and rated for twice your expected water pressure.
4.Connect a pressure regulator if necessary. Also called a pressure reducing valve, this reduces and regulates water pressure in your irrigation lines. Install this if your system has a water pressure above 40 psi (2.8 bars).

5.Fit the lateral line if necessary. If more than one drip irrigation system line will run from this line, install your PVC lateral line first. Each drip line in the area will run from this pipe.

  • Don’t forget to protect your lateral line from sunlight using aluminum tape.

Part3.Attaching the Drip Irrigation

1Assemble the the drip irrigation system lines. Use a tubing cutter to cut the drip tubing to desired lengths. Push each drip tube into a connector and attach the connector to your pressure regulator or lateral line. Lay out the drip lines on the surface of the garden.
  • Do not bury your drip lines, or they may end up chewed by rodents. Cover them with mulch if you wish to hide them — after you finish installation.
  • Add control valves before each drip line if you want to be able to adjust or shut them off individually.
2.Stake the drip lines in place. Secure the drip irrigation system lines using ordinary garden stakes.
3.Attach the emitters. If you are using drip emitters or micro-sprinklers, attach these along your drip lines. Use a small punch tool to pierce the drip tube, then insert the emitter tightly.
  • Do not use a nail or other improvised object, which may create a leaky, ragged hole.
4.Cap the end of each drip tube. Attach a flush valve or end cap to each drip tube to prevent water leaking out the end. While you could just bend the tube back and crimp it shut, these tools make it easy to inspect and clean clogged tubing.
5.Test the system. Set the timer on manual and turn on the water supply. Adjust the control valves until the emitters release a slow, steady trickle of water. Once finished, set the timer according to your garden’s needs. Check the whole system for leaks and repair if needed:
  • For metal to metal connections, either wrap the threads with Teflon tape no more than three times, or apply a small amount of pipe thread paste (“pipe dope”). Using too much tape or pipe dope can make leaks worse, especially with soft metals such as brass or copper.
  • Plastic threaded connections seal better than metal and are not designed to work with Teflon tape or pipe dope. Tighten them as far as you can by hand, then use a hand tool to tighten no more than one full turn.

Benidorm Ambassador Simon Adwellland and Overseas Cooperation Committee Leaders Visited Successfully

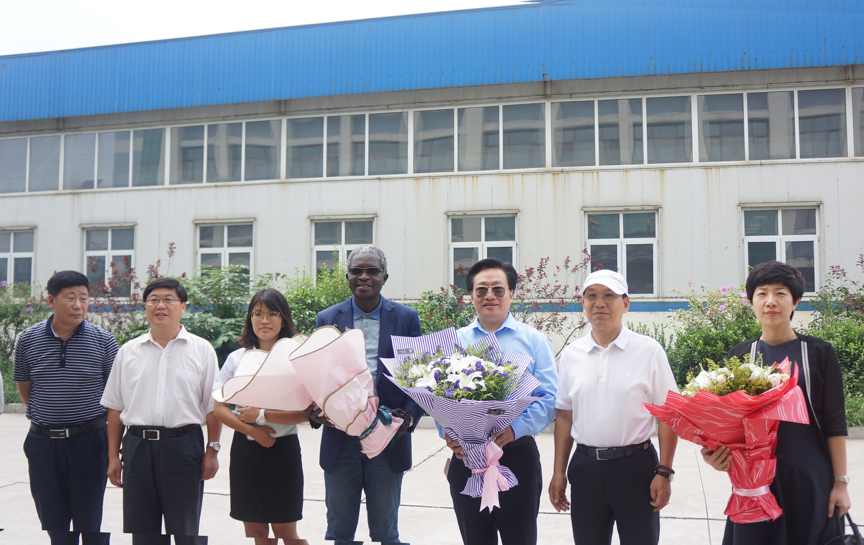
On August 16th, 2017, Simon Adwelllande, Ambassador of Benin, and Mr. Huang Zhaojin, President o...

Views 4,089

read more

Yushen Group 2016 employee travel activities

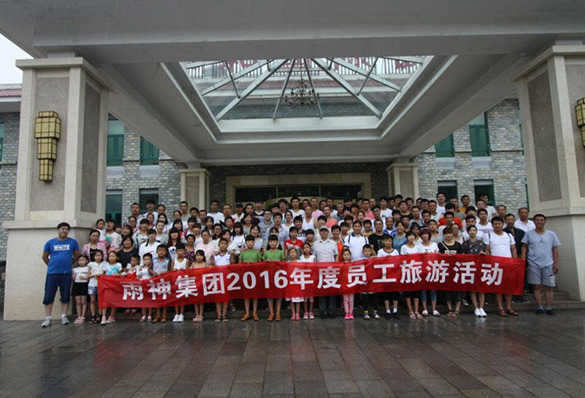
With a strong summer atmosphere, the company organized all employees to play in Shandong Qingzhou...

Views 4,069

read more

Rain God (Tangshan) Water Saving Technology Group “Mulan Paddock” Double Day Activities

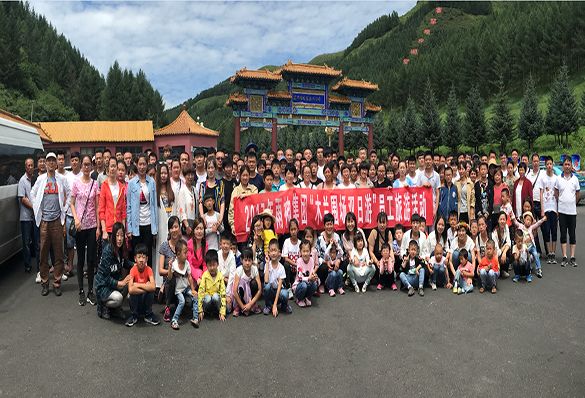
The Qing Dynasty Royal Garden – Mulan Paddock is located in the northeast of Hebei Province...

Views 4,686

read more